
Saddle height is a critical contact point on the bike for improved comfort, power and injury prevention. So, in this article I will be providing the framework for setting the correct saddle height, and in doing so, I will outline the ramifications for an incorrect saddle height and consequently the benefits of setting the correct saddle height from a biomechanical and anatomical perspective. Once I have presented the importance of setting the correct saddle height, I will provide a practical guide on setting an ideal saddle height.
So, why is saddle height crucial to performance, comfort and injury prevention?
Too often, cyclists, bike shops, or even bike fitters, set a saddle height that is incorrect for the cyclist riding his or her bike. Whether it is too high or too low, injury becomes inevitable due to the incorrect muscle groups at work, and in turn reduced power output.
As a result of a suboptimal saddle height, you may be experiencing symptoms of lower back, knee, neck or shoulder pain, yet, cannot pinpoint the cause. Or, you have been suffering some nasty saddle sores and blamed it on your knicks or the incorrect saddle despite the scientific and comfort benefits each saddle company has to offer.
Therefore, assuming the cleat position and the bike is optimal, the most likely cause to most, if not all pain and discomfort is due to the incorrect saddle height. Importantly, achieving the correct saddle height is crucial for both injury prevention and in turn improved power output at the cost of less effort.
The Solution
Utilising the same formula for setting the correct cleat position, one can achieve the optimal saddle height:
“Comfort and power on the bike is the product of anatomical structures of the human body corresponding to the contact points on the bike – pedals, saddle and handlebars [1]”.
To set the correct saddle height, an understanding of the human anatomical structures and how the body functions biomechanically is of vital importance.
The bones within the human body interact with each other through the involvement of its ligaments, tendons and muscles that allow the oscillation of the joints to occur. The interaction is often referred to the kinetic chain. As the movement of one bone or joint takes place, movement of a different joint or bone initiates at a distal (further above or below) joint.
Putting this into perspective, the advancement of technology in the 21st century has caused many to lead a sedentary lifestyle. In turn, such advancement has resulted in ‘too much sitting in an office chair’.
The change in lifestyle has caused many overuse and underuse injuries such as weak core muscles, tight hip flexors and a myriad of other injuries.
As a result, curiosity begins to build up whereby the individual seeks some physiotherapy, exercise physiology and myotherapy to curb those injuries.
Eventually, the result is often a change in ergonomics such as standing desks, supportive chairs and often an exercise intervention plan.
Cycling is no different.
Comparable to the way we sit in an office chair for extended periods of time, we also cycle in the same position for multiple hours at a time.
After all, we want to be comfortable on the bike and to enjoy every moment injury free.
Correct saddle height is the most crucial aspect of a bike fit.
So how can you find the optimal saddle height?
Obtaining the correct saddle height involves an understanding of the human body – its abilities and limitations.
For example, limited hamstring flexibility requires a lower saddle height due to the inability to optimally extend the leg. Alternatively, a lack of muscle strength will incur a non-fluid pedalling action. Through lowering the saddle, a fluid action can be achieved.
Many people set their saddle height through 2D computer motion analysis, estimations or through using equations such as the common LeMond method and various other approaches [2,3]. Methods such as the LeMond utilise the length of the inseam multiplied by 88.3% of the saddle-height to the bottom bracket [2].
Without disqualifying such methods, unfortunately the use of equations and 2D analysis can only ensure positive results for the ‘average’ cyclist with the assumption the bike is the correct size, along with the rider presenting with relatively proportional limb lengths.
As such, a cyclist with a long femur (thigh bone) may achieve a saddle height that is too high for his or her flexibility and muscle strength, thereby resulting in injury [2].
The consequences of a saddle too high or too low
When a cyclist experiences back, neck, shoulder, knee, hip pain and most notably saddle sores, often the cause is the result of a saddle that is too high. When the saddle is too high, the natural tendency of the human body is to provide compensatory measures.
That means, the brain naturally protects the dominant side of the human being. For example, a saddle height that is too high, is likely to cause saddle sores on the left leg due to excessive extension of the knee whilst the dominant leg remains ‘protected’ and in full control over the pedal stroke.
Additionally, an excess saddle height is likely to cause the cyclist to ‘toe dip’ and a drop the pelvis as a measure to increase the lever arm (legs) over the cranks. In turn, pelvic asymmetry can occur and can cause a numerous injures and discomforts such as a saddle sore.
Putting this into context, lets now compare the way human muscle operates in comparison to the ‘rubber band ‘. A rubber band has a limited amount of stretch and when the band is stretched to its fullest, it will no longer continue to give. As such, overstretching the band will cause it to snap. While, under-stretching will charge the band with elastic potential energy and will allow it spring close.
The same applies to the lower limbs of musculoskeletal system during cycling. For example, when the hamstring muscle group is overstretched during the down stroke, it will lose its elastic energy that is required to control the patella (knee) in conjunction with the quadricep muscle group. In turn, the overstretch can also strain the hamstrings.
When the hamstrings lose control, the quadriceps are likely to become the dominant muscle group propelling the bike forwards. In turn, overloading of the quadriceps is likely to be experienced, thereby resulting in the early onset of quadricep fatigue. Additionally, the quadriceps may provide too much force over the patella, thereby dominating the responsibility of the hamstrings to equally stabilise the knee.
Utilising the above analogy of the ‘rubber band’, a low saddle height perfectly allows for the lower limb kinematics to operate in a functional manner – a knee extension that does not overstretch the hamstrings whilst allowing the quadriceps and gluteals to provide force and control of the pedal stroke.
Injuries or discomfort from a saddle height that presents to be too low is unlikely, for the very reason that leg extension remains within a comfortable range of motion (ROM). Consequently, studies have shown that optimal ROM at the knee joint should range between 25-35o in a static position [3]. However, ROM must also consider ankle dorsiflexion, hip and torso angles which can likely alter knee extension.
A low saddle height, can therefore equally spread the fatigue between the major muscle groups when compared to an excessive saddle height.
However, when the saddle height is extremely low, often the shortening of the hamstring muscles can result, and in turn cause a tight lumbar spine. Hamstring tightness can result from overuse of the hamstrings in a manner where they do not extend optimally.
Comparatively, short and tight hamstrings can be associated with sitting in a chair, where the hamstrings are constantly in a flexed position.
Yet, for most cyclists, a low saddle height often does not incur injuries or discomfort.

Low saddle height – excess flexion at the knee joint.
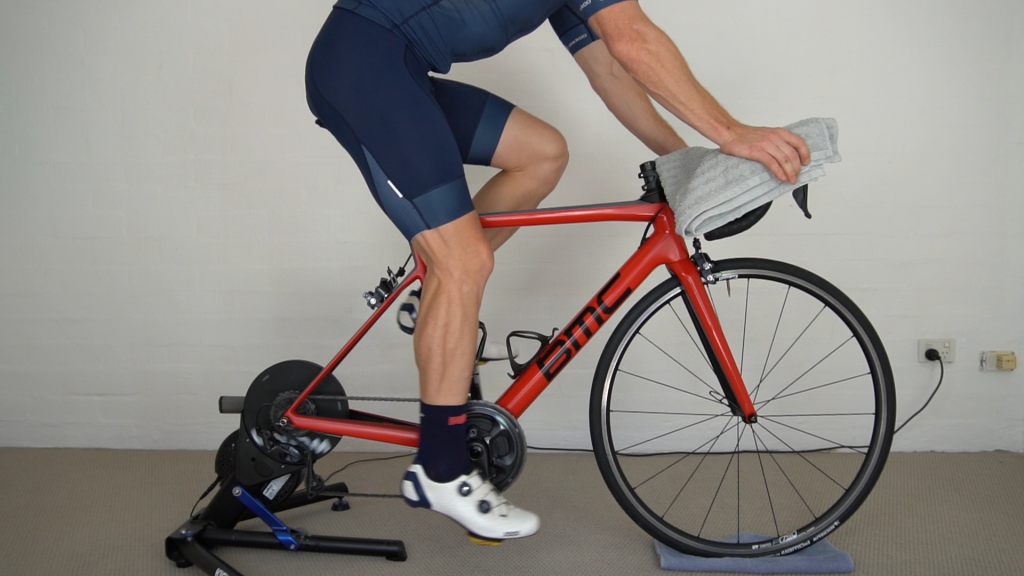
Excessive saddle height – note the extreme toe dipping as a compensatory measure to assist with reaching the bottom of the pedal stroke.
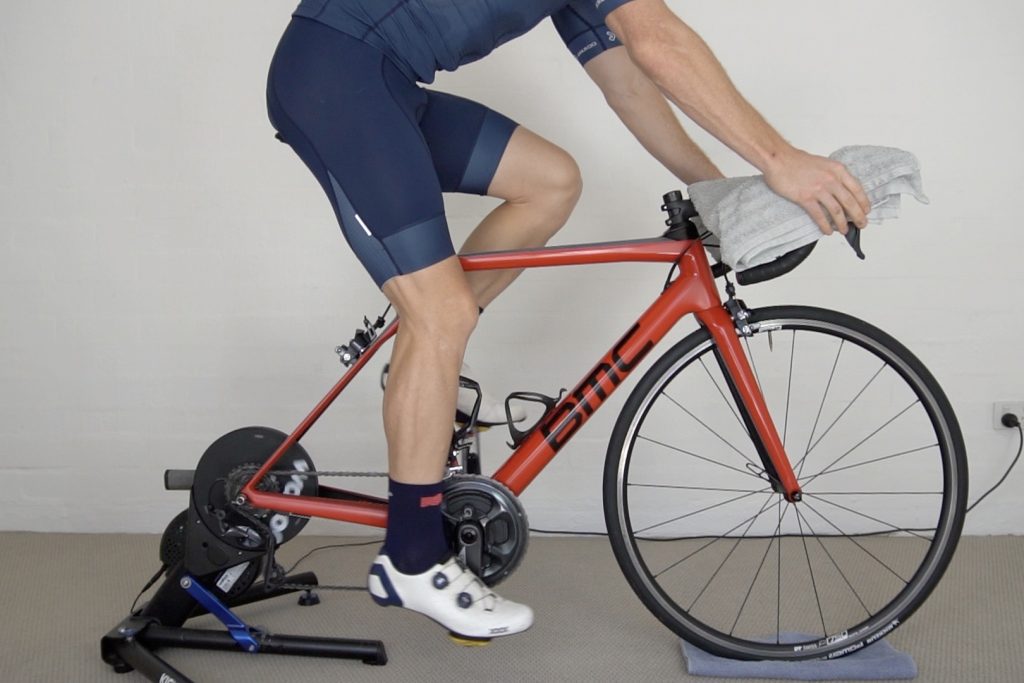
Optimal saddle height – the knee is optimally extended whilst maintaining slight, yet optimal flexion.
How to determine the correct saddle height
The pedalling motion requires full control of the hamstrings, quadriceps and gluteals to support the pelvis over the saddle. When the saddle is too high, control is lost. If the saddle is slightly low, control and support is not lost.
A fluid pedalling action requires the lower limbs to control the knee through providing force on the down stroke whilst maintaining control through the power phase into the up stroke. Excess saddle height often results in snatching of the knee, where the body attempts to balance out the pedal stroke.
Through basic video analysis, extreme knee snatching can be identified. However, slight snatching may be not be qualified.
To determine the correct saddle height, lowering the current saddle height by approximately 20mm can allow for one to determine the optimal height through slight increases in height.
Once the saddle is ‘too low’, a 20-minute tempo effort should be executed – an effort hard enough to feel some fatigue. Following the effort, the cyclist should then raise their saddle height by approximately 3mm and continue cycling in intervals of 3 minutes and consequently raising their saddle by another 3mm. When the cyclist can qualify his or her comfort levels on the bike, where a sensation of complete pedal control is recorded, the saddle height is optimal.
If some knee-snatching or a loss of control is noted, lowering the saddle by 1-3mm would suffice. Once the saddle is set to an optimal height, fatiguability of the quadriceps, hamstrings and glutes tend to be equal. If promoted comfort is sensed over the saddle, whereby less hand pressure on the front-end is experienced, the saddle height is likely to be in the optimal position thus correctly supporting the pelvis.
Remember, if the saddle is too high, the musculoskeletal system is working beyond its limitations. When the saddle is at a relatively ‘lower’ height, the musculoskeletal system is performing within its optimal range.
Saddle sores, rethink the cause!
References:
[1] A. Goldschmiedt, “How to set your Cleat Position Correctly – Road Cycling Academy”, Road Cycling Academy, 2020. [Online]. Available: https://roadcyclingacademy.com/cleat-position-cycling/.
[2]R. Bini, P. Hume and J. Croft, “Effects of Bicycle Saddle Height on Knee Injury Risk and Cycling Performance”, Sports Medicine, vol. 41, no. 6, pp. 463-476, 2011. Available: 10.2165/11588740-000000000-00000.
[3]V. Ferrer-Roca, A. Roig, P. Galilea and J. García-López, “Influence of Saddle Height on Lower Limb Kinematics in Well-Trained Cyclists”, Journal of Strength and Conditioning Research, vol. 26, no. 11, pp. 3025-3029, 2012. Available: 10.1519/jsc.0b013e318245c09d.
Hi Cam, great content,
I’m suffering from left knee pain, abd never heard about the dominant protection! Great sources as well!! So i could read further more… thanks a lot, greets from Austria!